Week 3 of the Butterick Retro Pattern 4790 Sew-Along!
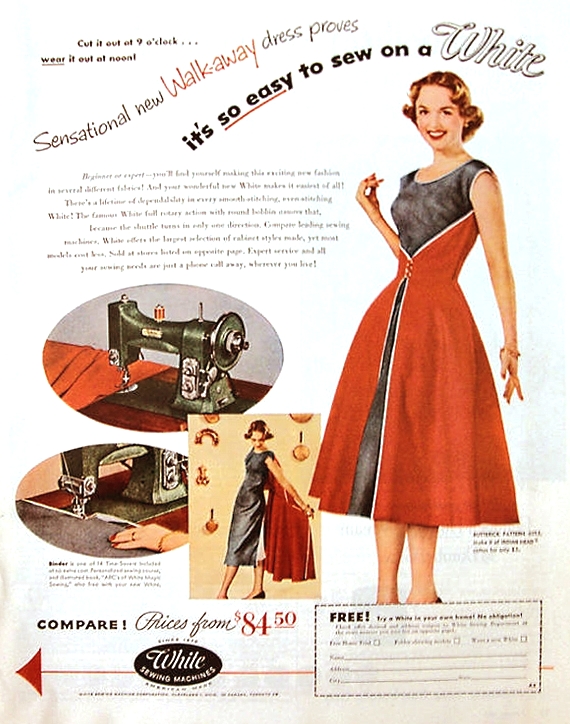 Hello Ladies! This week we will finish sewing our Butterick 4790 50s dresses! If you have not finished all the previous steps mentioned in Week 1 and Week 2, don’t worry – you can post the link to your finished dress pictures whenever you like.
So at this point our dresses are all assembled, they just need the finishing touches such as the raw edges finished, the snaps put on, and the skirt hemmed.
Bias Binding
You have two options for binding your dress. The first option is to fold the double-fold binding over the raw edge and stitch in place as your pattern instructions call for. The method I prefer to use makes the bias binding be visible only on the inside, which looks a lot less “homemade” in my opinion. Of course you may have different preferences depending on what material you are sewing with, but below I am illustrating the method I’ve used on all the 1950s dresses I’ve sewn.
1. Pin the right side of the bias binding to the right side of the dress.
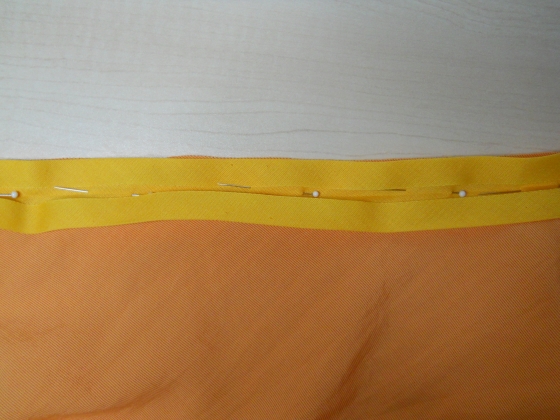 2.Stitch in place, with the needle hitting the binding right through the fold line.
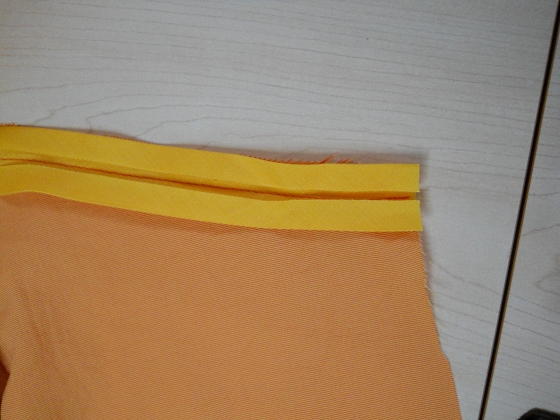 3. Trim the seam allowance down to 1/4″. Press the seam flat, then press the seam open.


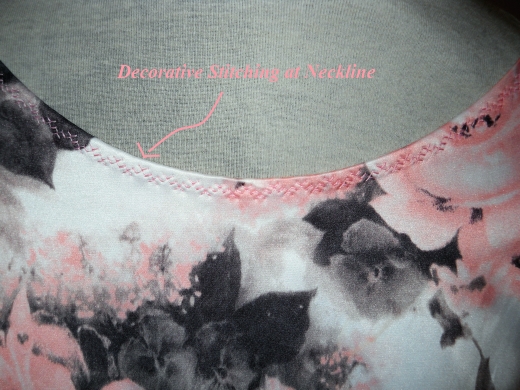
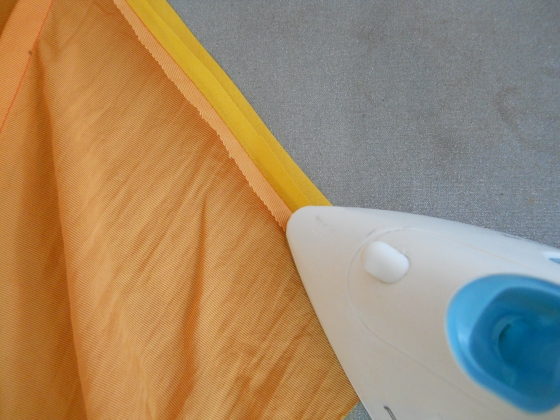 4. Finally, turn the bias binding to the wrong side of the dress and press. Pin in place and stitch the binding to the inside using either a machine or handstitch. On my orange 1950s dress I finished the entire garment with tiny hand stitching, but on both later versions of Butterick 4790 I used a decorative machine embroidery stitch which went much faster!
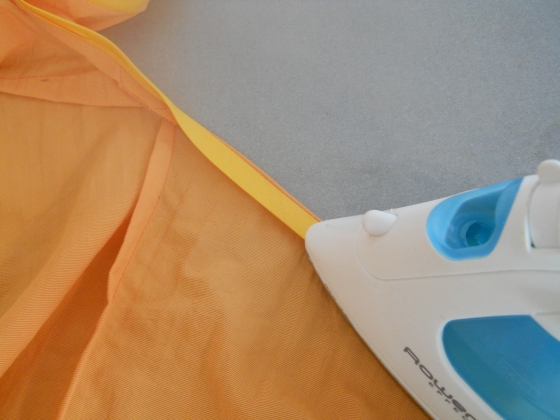 5. Once the binding is sewn, press it one more time to smooth out any “bubbles”.
That’s it! I love working with bias binding since it maneuvers so easily around the curves and gives a fast, clean finish to raw edges. As the pattern instructs, you will use your bias binding to finish the neckline, armhole side edges, and the vertical skirt opening edges. To be entirely honest, I actually don’t bind the vertical skirt edges, since I usually buy as few notions as possible. : ) Of course you can do whatever you prefer, but I only bind the neckline and that one long curve from the center back to the center front. Then I serge the side edges of the front piece (that ends up closing in the back), and the side edges of the circle skirt I hem by machine or hand. Note: Before you bind or hem your vertical edges, you need to try on the dress to make sure it is very fitted in the bodice. If it is too loose, you can just make a wider hem down the center front opening to pull the edges together.
Snap Closure
Now you can sew your snaps and buttons in place! Here again, I do this just a little differently than what the Butterick instructions suggest.
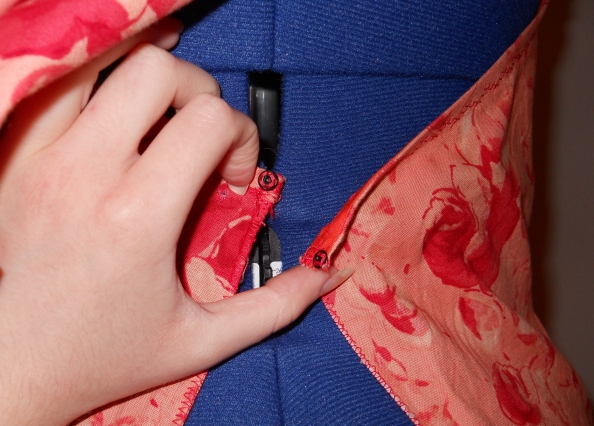 For the front piece that closes in the back, I simply sew either a snap or a hook and eye to the respective edges which closes very quickly in back without any lumps from a button. You’ll notice that the pattern instructions calls for making a button loop out of the bias binding on one side and sewing a button to the other side, but not only is this method a bit tricky to make (with the loop fitting the button exactly), it also can add more bulk to the dress in back. (You don’t want it to be obvious that there’s a button underneath the waist seam!)
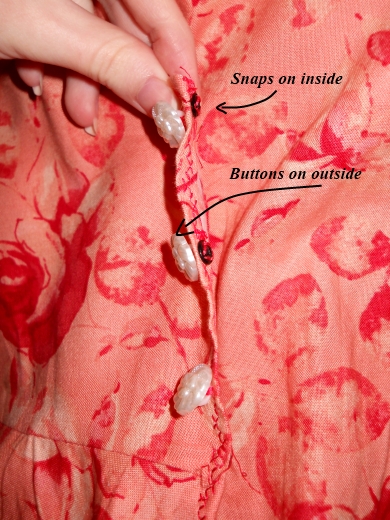
For the back piece that wraps around to the front, you just sew three sets of snaps going vertically down the center front closure. Once you have the snaps properly closed, you can sew three or four decorative buttons right over the top on the right side of the fabric. This is such an easy way to get a “buttonhole” look without all the work of actually making buttonholes! (But before you sew your snaps on, you will need to try on the dress to make sure it is as fitted as you like.)
Hem Your Dress!
This is the last step! After your dress has been hanging for at least three days, mark the hem and cut off any uneven edges. If you have a dressform, simply fasten the dress on the mannequin just as you will wear it and mark an even distance all the way around. If not, you can have a friend mark it for you while you wear it. You can hem it by machine or hand, but my favorite method is just to serge or tightly zigzag the bottom edge without turning it up at all. This is because a circular hem will always have a little too much fullness to lay quite as flat as I like. Surprisingly, the over locked edge has looked great on all the 1950s dresses I’ve made, and creates a dainty finish for such a flared, flowing skirt.
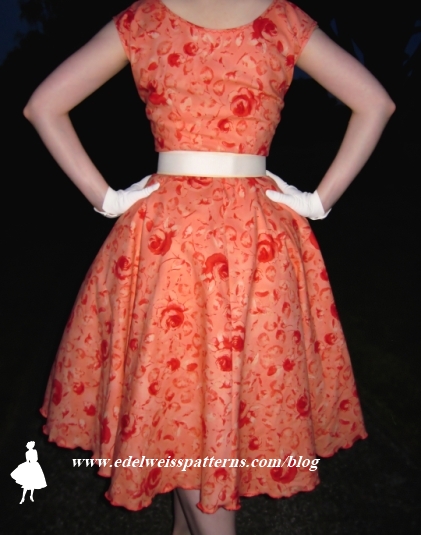
Congratulations! You just made an authentic 1950s walkaway dress! Of course this is just the basic dress, and there are many decorative touches you can add to spruce it up.
-
Consider wearing a ribbon belt around the waist like I did with my cotton 1950s day dress,
-
or pin a flower at the waist or towards the neckline. When I wore my orange 1950s dress (with the white flower accent) to the store, a sweet old lady said, “You look just like we used to dress in the 50s – we highschool girls had a different flower for every outfit!”
-
One of the most popular accents of the day was a wide, vinyl belt over their tightly-fitted bodices.
-
Another idea for embellishing this dress is to put a small ribbon bow at the neckline,
-
or to sew a ruffle of contrasting tulle to the inside of the dress hem for a classy 1950s party dress look!
-
Do a Google search for “1950s Dresses” or look through some of the patterns at www.sovintagepatterns.com for more ideas on how to embellish your 1950s dress!
-
And if you’re going for the “1950s housewife” look, there’s nothing more appropriate to accesorize your dress with than a vintage apron!
So now that our dresses are finished, we will have our “1950s Dress Party” next week where everyone can link to their pictures of the walkaway dresses (on a blog, Flickr, etc.) You are also welcome to email me pictures if you’d like me to include them in next week’s post.
Let’s try to think of some creative photo shoots for classy or retro themed pictures! You might want to have the pictures taken in a retro-themed diner, in front of a 1950s bungalow, or in an elegant flower garden to make the setting just as lovely as your new dress! Wearing a 1950s dress is only half the fun, because you’ll look so much more vintage if you wear a crinoline petticoat, vintage hat, and some white gloves to complete the look! So curl your hair, put on your high heels, and really go all out for this! If your hair is shoulder length or shorter, it will be so easy to reproduce a 1950s hairstyle. If it’s longer, you can style an elegant up-do or curled ponytail. I look forward to seeing what everyone comes up with!
Happy sewing,
Katrina


[…] Week 3 of the Sew-Along (Bias Binding, Snaps, and Hemming Your Dress) border=”0″ /> […]
When you secure the bias tape with a decorative machine stitch, did you have the bias tape facing up or down?
How did you get that lettuce-edged look on the hem using your serger?
Thanks,
–C.B.
Hello Catholic Bibliophagist,
To achieve the “lettuce hem” edge, you just lightly stretch the fabric behind and in front of the machine as it is finishing the edge. You might test it on a swatch first, but it is really a very simple finish!
As far as the bias tape goes, I’m not sure exactly what the question is. For the decorative stitching, I was stitching on the right side of the fabric with the bias binding pinned to the wrong side. Does that answer your question? Let me know if it doesn’t.
Happy sewing!
Katrina
This is incredible, I stumbled on your blog just today, but I bought this pattern a week ago, apparently I am not the only one that loves it!
Hello De,
Glad you found the articles on the Butterick walkaway dress! Of all the many dozens of patterns I’ve sewn with over the years, Butterick 4790 is one of my favorites once you’ve done the necessary fitting adjustments, and assuming you wear it with a crinoline. Thanks for the comment!
Happy sewing,
Katrina
Hi katrina,
Thanks once again for this sew-along. I don’t think that I would ever have tried to make this dress had it not been for you.
I am a little behind, but hope to get caught up soon and I will post some pictures – if the dress looks ok. I bought some gingham a while a go but now I am not sure about it, hence the indecision as to whether I will post pictures.
Ronniie
Hello Ronniie,
Glad you are enjoying the sew-along! Don’t worry about being behind at all! I still haven’t finished my dress yet, either. : ) Gingham is really the perfect material for this 1950s dress, and I’m sure it will turn out beautifully! I have rarely sewn a dress that had to be discarded altogether, because even if at first there seems to be something wrong with it, you can almost always find a solution to fix it! I look forward to seeing what you come up, and feel free to let me know if you have any questions.
Happy sewing!
Katrina
Ooohhh! I love the idea of the decorative stitching at the neckline. Thanks for the suggestion!
Hello Alice,
Glad you like the idea! Thanks for commenting!
Happy sewing,
Katrina
I agree I would have never of made it if it was not for you. Did not do the petticoat underneath as not for me…..I will post pics soon.
Thanks it was fun 🙂
Hi Simone,
So glad you enjoyed it! I am looking forward to posting pictures starting next week.
Happy sewing!
Katrina
Yes, Katrina, that’s exactly what I wanted to know! (about the bias tape)
Oh, good! Glad that answered your question!
Can’t decide on what material to use.
I have some red gingham..but then not sure what to ‘contrast’ it with plain red or a blue polycotton?
I also have lovely cream and green floral material.
Choices, choices.
Hope you don’t mind…used your template to photoshop in the different materials to see what they would look like. Think I’m leaning towards the gingham.
http://i1176.photobucket.com/albums/x336/LDT2011/1950s-walkaway-dress-drawingA.jpg
http://i1176.photobucket.com/albums/x336/LDT2011/1950s-walkaway-dress-drawingb.jpg
http://i1176.photobucket.com/albums/x336/LDT2011/1950s-walkaway-dress-drawingC.jpg
Cute ideas! I love the different color combinations you came up with. Looking forward to seeing your finished product!
Happy sewing,
Katrina
Thank you so much for your sew-a-long!! I got this pattern and was a bit stuck on how to get started (being an adventurous newbie) but now its running smoothly! I really do enjoy your site!!
So glad it has been helpful for you, Marla! I’d love to see pictures of your finished dress. : )
Happy sewing!
Katrina