

Hand sewing is wonderfully therapeutic, and smocking, in particular, creates exquisite handiwork that often becomes a family heirloom. Don’t let the phrase “hand sewing” scare you – with just a little bit of practice and a few simple supplies, you can master the honeycomb stitch in an afternoon or evening! Set up your workspace to be clutter free, and make sure you have all your supplies in front of you. Then pour yourself a cup of tea and proceed. (Note: If you want to learn to smock but aren’t using this pattern, feel free to skip down to steps 5-13.)
To Honeycomb Smock You will Need:
- Fabric to practice on – cotton is ideal
- One sharp hand sewing needle
- Thread & thread snippers
- Fabric marker
- Measuring ruler
- Pins
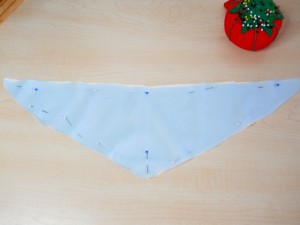
1. Using pattern piece 8, lay one sheer “v” panel on top of one lining “v” panel and pin in place.
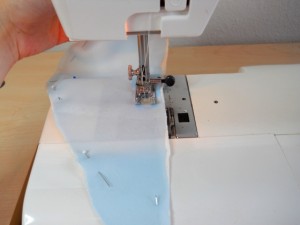
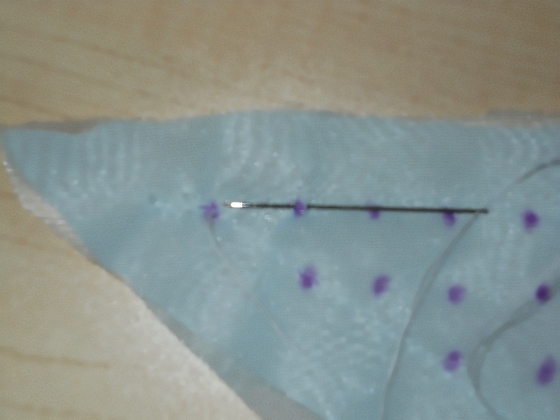
2. Machine stitch around the edges of the “v” panel, keeping the needle exactly 5/8″ away from the edge. (This will serve not only as a means to keep the two layers together, but also as a guide for marking the dots to smock.)
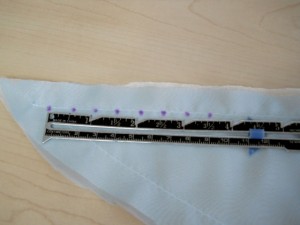
3. Beginning directly underneath the stitching line at the top of the “v” panel, mark with a fabric pen at 1/2″ intervals from one end of the stitching to the other. (Start and end where the machine stitching ends.)For the second row of dots, keep the markings in line with the top row, making sure that the second row is 1/2″ below the top row. Continue marking the dots 1/2″ apart on the inside of the machine stitching until the entire inside of the “v” panel is marked. Be sure to mark only on the inside of your machine stitching!
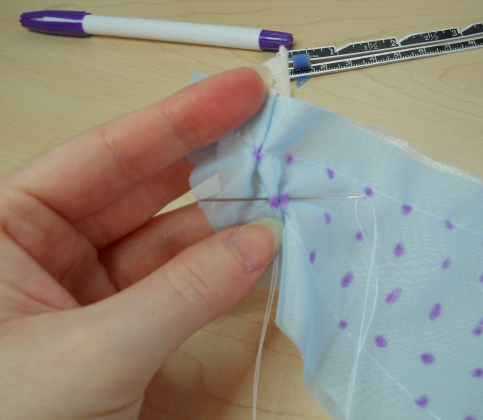
4. Now it’s time to smock! Thread your hand needle with a double thread and knot the ends. On the first dot on the far left, bring your needle up from the bottom (so the knot will be underneath) and take one small stitch (down and up) under the dot directly to the right of the first dot.
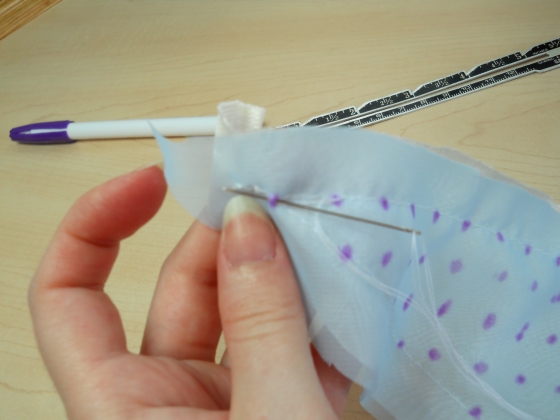
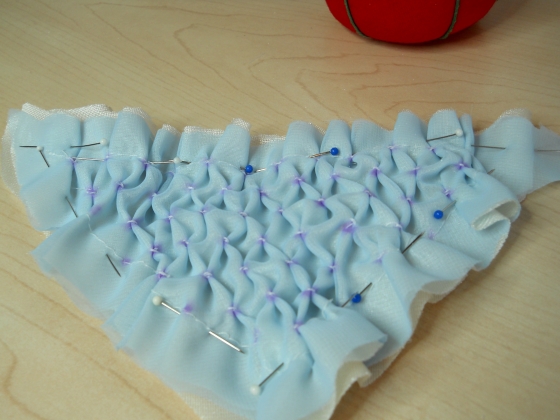
5. Without tightening the thread, take a small stitch through the first dot just as you did on the second dot.
6. Now pull the thread tight so that the first two dots you stitched through are pulled together.

7. Take one firm stitch down, right through both dots you pulled together so they will be held in place and not slip apart.
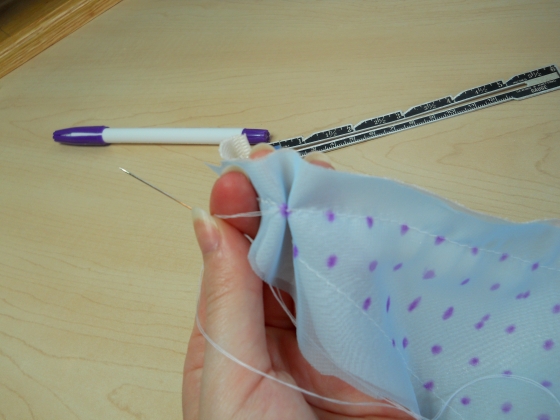
8. You’ve already learned the basic stitch – now it’s just a matter of learning the sequence! On the dot directly below dot number 2, come up with your needle, making sure that you don’t pull it too tightly (you want the top layer of dots to lay flat, not to be pulled down towards the second row.)
9. Just as you did in steps 5 and 6, take a stitch through the dot directly to the right, then one through the dot you came up on. Pull the two dots together tightly, and take one firm stitch through both layers.

10. Now you are going to do the same steps again, but this time you will start on the dot directly above the one you just finished. Repeat steps 5-8, and after you have finished one set of dots, you will continue alternating sewing the dot above or below the dot you just finished.
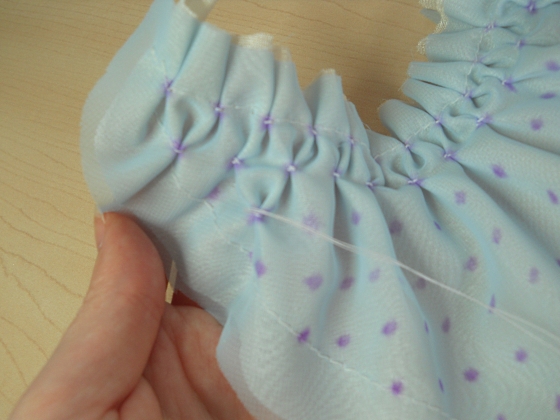
11. Once you get to the end of a row, tie a knot in the thread and begin all over again on the left side of the fabric, one row underneath the row you just completed. As you did in the top row, you will stitch through two dots (the first one you come up through and the one to its right), then repeat the steps, alternating starting one dot above the one you finished and one dot below.

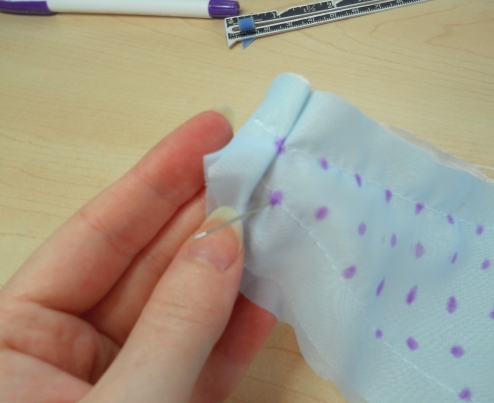
12. Continue with your honeycomb smocking until the entire panel is stitched.
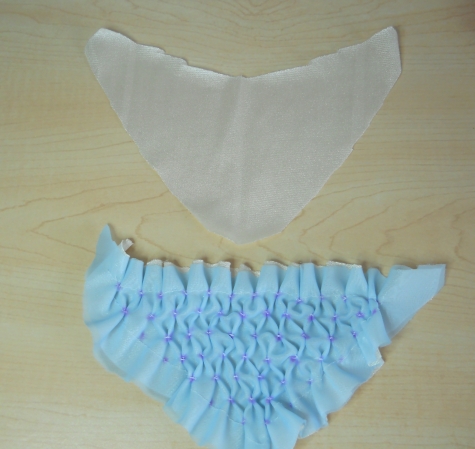
13. Now that you have finished your smocking, you’re ready to proceed with sewing your Maria’s Gazebo Dress. Place the finished smocked panel over the “V” panel lining (pattern piece 9). Shape to match piece 9 exactly, pin in place, and baste through all the layers with machine stitching around the outside edges.
Continue assembling the dress as per the pattern instructions.


Once you’ve learned how to smock, you will have a plethora of projects on which to use your skill. You can add hand smocking on everything from christening gowns, little girls’ dresses, evening clutches, to Victorian costume reproductions and women’s blouses. Because honeycomb smocking naturally has a bit of “give” or stretch to it, you can use this stitch to control fullness in a garment where you will need to have some movement. In fact, smocking was the precursor to elastic in the garments of antiquity, and as early as the 1500s paintings featured smocked panels in areas such as the sleeve ends or above the bustline. If you want the smocked detail but without the stretch, you can smock a panel and flatline it, then treat both materials as one piece of fabric. That’s exactly what we’ve done in this tutorial, up in Step 14.
To read more about our Maria’s Gazebo Dress pattern, click here.
Happy Sewing!
![]()

[…] If all goes as scheduled, this “Sound of Music” dress pattern should be released in late summer, so stay tuned for more updates! To learn how to do honeycomb smocking for this lovely Sound of Music dress, read our new tutorial here. […]
Greetings,
Oh what a lovely cover for your pattern!
Might I ask where you took the photo?
It looks like you are in a lovely Swiss village.
The smocking tutorial was great, I will have to use that on something. Very helpful! Thank you. I have done a bit of smocking, but not that pattern.
Hello Brielle,
Thank you! Yes, I had the photos taken in a Bavarian themed town called Leavenworth, Washington. Leavenworth has been one of my favorite places in the world for years, and it is the most delightful little resort town – you really feel like you stepped into the Austrian Alps! And you can’t tell from the pattern front, but that picture was actually taken inside a gazebo, furthering the “Maria’s Gazebo Dress” theme.
Glad you enjoyed it!
Katrina
Thank you!!!! I cannot wait to purchase this pattern when it comes out and was wondering how I was going to pleat that. This tutorial will help immensly!
Kristen
[…] This pattern is rated for intermediate seamstresses, but I’ve included detailed sewing instructions and illustrations, along with an online tutorial for how to create those lovely honeycomb smocked panels. […]
Thank you.. can not wait to make a dress for my baby with that…